| 1. |
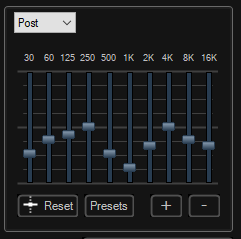
Graphical Equalizer:
Adjusts the sound envelope of your voice. It consists of a series of band
controls that modify the sound over 10 separate frequencies. You modify
the sound level in a band by moving a slider up to boost or moving the
slider down to attenuate. By default, the band levels will all be in the
middle, at zero decibels (dB). The range of these controls is
from -20 dB to 20 dB. The lower frequencies/bands will be on the left side
of the graphic equalizer (30, 60, 125); the higher frequencies/bands will be on
the right side of the graphic equalizer (4k, 8k, 16k).
|
| 2. |
Reset Graphic Equalizer:
This will set the graphic equalizer bands to neutral levels (zero decibels).
|
| 3. |
Set Equalizer Preset: Sets the graphic
equalizer bands to standard (speech, harsh, soft) or custom preset levels.
When you click this button, a list will appear next to the button. Click
on the name of the preset to select it. The graphic equalizer bands will be
adjusted after you make a selection.
|
| 4. |
Add Custom Equalizer Preset: Lets you
create a new custom preset. First adjust the graphic equalizer bands.
Next, click on this button. A New Equalizer dialog will appear with text
to enter. Fill out these text fields and click the 'OK' button. The custom
preset will now be available in the Set Equalizer Preset button list.
|
| 5. |
Delete Custom Equalizer Preset: To
delete a custom preset, click on this button. A Delete Equalizer Setting dialog
will appear. Select the preset you wish to delete in the text box, click on the
'X' button, then click the 'OK' button.
|
|